A Practical Guide to Screed Testing: What Do the Experts Say?

A Practical Guide to Screed Testing: What Do the Experts Say?
Floor Screeding Industry Icons
![]() Right from the very term ‘screeding’, the floor screeding industry has a long list of terms and terminologies that could appear baffling not just to the ordinary layman, but even to those within the construction industry. As part of CSC’s continuous efforts to help educate our clients, staff, partners and associates within and outside the industry, we have compiled the resource websites- floor-screeding.co.uk and screedprotection.com.
Right from the very term ‘screeding’, the floor screeding industry has a long list of terms and terminologies that could appear baffling not just to the ordinary layman, but even to those within the construction industry. As part of CSC’s continuous efforts to help educate our clients, staff, partners and associates within and outside the industry, we have compiled the resource websites- floor-screeding.co.uk and screedprotection.com.
We also gave form to ‘the friendly little bespectacled trowel’-the face of our Screed Scientist website, to add life to the long texts of floor screeding information and advice. Now, in a further initiative to help create a common language within the industry and facilitate clearer communication, we have developed a set of screeding icons, which we hope will make the task of communication easier and help us convey important screeding information in a simplified manner.
Given below are the various icons and explanations of what they stand for:
Screed Pump: A screed pump is a machine used for forced action mixing and application of screed at the work site. The screed pump is generally used for site mixing and pumping of screeds to upper floors, and differs from ordinary screed mixers in that- it mixes the screed by volume, increasing the accuracy in measurements.

![]()
Screeding: Indicates the process of floor screeding. Floor screeding involves the application of a mixture of cement and sand mixed in the ratio of 1:3-5, to provide a level surface for taking on the final floor finish.
 Site meeting: Clear communication is imperative for the success of every project. A successful screeding project requires clear communication and the setting of clear objectives.
![]() Time to light foot traffic: Indicates the period of time after which light foot traffic can proceed on a newly screeded floor with protection. Though most screeds stipulate a minimum of 24-48 hours of drying before resuming activity, modified screeds such as FlexiDry allow foot traffic to proceed as early as 12 hours after installation.
Time to light foot traffic: Indicates the period of time after which light foot traffic can proceed on a newly screeded floor with protection. Though most screeds stipulate a minimum of 24-48 hours of drying before resuming activity, modified screeds such as FlexiDry allow foot traffic to proceed as early as 12 hours after installation.
 Time to full strength: Indicates the time required by a newly laid screed to attain its maximum strength. This is also the period of time for which the loading of heavy weights should be avoided. Though the drying time varies for every screed, most screeded surfaces require a minimum of 28 days to reach their full strength, irrespective of the dry time.
 Laser Levelling: Involves the installation of screed with the help of a laser control system for ensuring an accurate level finish from datum.
 Levelling: It is the process of ruling and compacting the installed screed to make the surface flat and regular.
 Hardness Test: Indicates the method of assessing the hardness or in-situ crushing resistance of screeds. The BRE drop hammer test is generally employed for this test. This is carried out by making four consecutive blows on the screed surface using a BRE hammer, and the depth of the indent is used to assess the strength of the screed.
Day joints: These are the positions where screeding is finished for a day and will be resumed the following day. Day joints are made at 90 degrees to the screed and connected using steel mesh or ties.

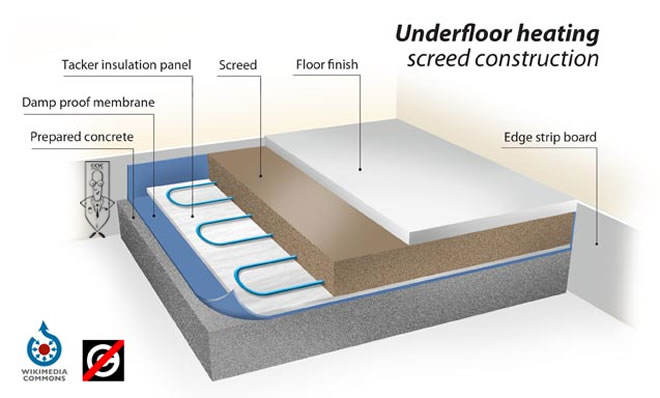
Also given below is a diagram explaining the screed system used for underfloor heating.

The screed layer for underfloor heating systems is usually installed over underfloor heating pipes secured to tacker insulation panels. The insulation panels are laid over a concrete floor base, separated by a layer of damp proof membrane. This is done to prevent the penetration of moisture from beneath. Once the screed layer has dried optimally, the final floor finish can be installed as the final layer of flooring.


