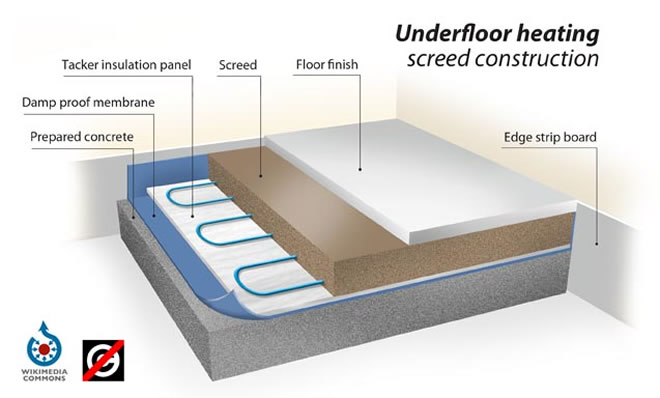
 The following information is a guide to the installation of rigid insulation on ground floors to receive a screed.
The correct installation of polythene DPM, rigid insulation and separating layers are highly important to the overall integrity of the system.
Let’s put the technical thermal resistance and U values, damp proofing and slip performance to one side and leave that to the design consultants and architects. We are only interested at this point on the correct installation process for the operative.
1st of all, the condition of the concrete floor slab should be checked for imperfections. The main points are that the concrete substrate is reasonably level, free of mortar matrix, clean and enough space to receive the overall designed floor finish. This will require some level checks, generally carried out by the principal contractor. Checks should also be made to see if there are any steps or voids, generally experienced in pre-cast concrete planks which are pre-stressed. It’s important to flatten sudden irregularities with some sort of levelling system. The most efficient method is to apply sharp sand and taper out the step. The insulation should not be stepped as this can act as an anchor point and cause cracking in the screed under movement or bridging will cause weak spots in a void underneath.
 The polythene damp proof membrane, generally a 1200 gauge is rolled out into place ensuring adequate lapping up the perimeter abutments. Ensure enough is lapped to encompass the whole floor build up with a little excess. All laps and joints should be at 150mm and taped to avoid displacement.
We are now ready to install the rigid insulation.
Generally a 25mm thick perimeter strip of the same floor insulation is installed at full depth to all external walls. This is to stop cold bridging and is vitally important. The floor insulation can now start and consideration should be made to setting out. Any services that are contained in the insulation may require either routing or cutting either side and sanded. Joints should be staggered similarly to brick laying which ensure the insulation is interlocked. This can then be taped into place with either a gaffer tape or sometimes a foil tape which forms a system. Some insulations have a pre-laminated separating layer which has flaps, these can be taped down providing the finished system.
A perimeter strip to the internal perimeter walls, abutments, columns, any service penetration such as soil pipes, gas pipes, raised man holes, electric floor sockets, ducts, etc. Generally a 10mm soft polyethylene strip is used and simply rolled out along the perimeter and taped into place. This should finish above the finished floor zone. Particular care should be taken to ensure there are no gaps, internal corners are tight, and external corners are tidy. The best way is to cut the internal corners so they fit tight and tape, this will stop rounded corners and ensure the screed sits tight. External corners should also be tight and taped into place.
Rigid insulations without the pre-laminated membrane will require a separating layer, generally a 500 gauge polythene. This is rolled into place exactly the same way as the damp proof membrane and taped into place.
We are now ready to install a quality screed system.
Disclaimer: Correct at time of publication V1 April 2011.


