

From the desk of The Screed Doctor
Hello folks! Welcome to my surgery where I help diagnose and treat poorly performing screeds. Over the years, I’ve seen all sorts of screed ailments – from the common cold of surface dusting to the serious conditions of delamination and structural failure.
Just like human health, prevention is always better than cure. Proper care during those critical first days can save you from expensive surgery later on. Let me share my diagnosis techniques and treatment recommendations to keep your floors in tip-top condition.
Prevent damage from construction activity
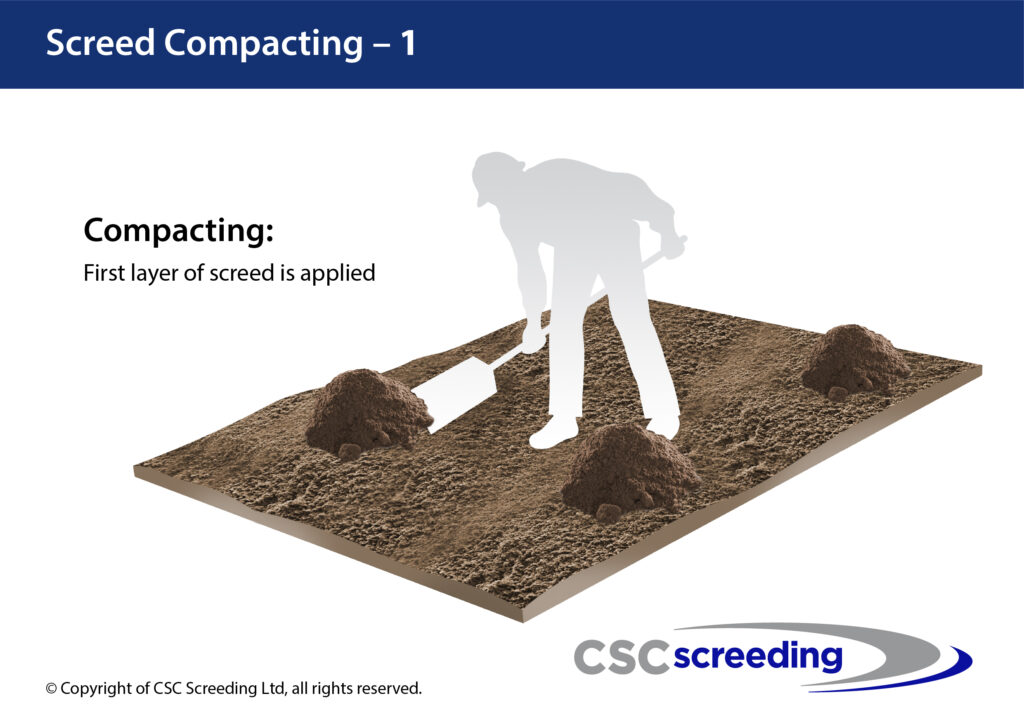
Apply the first layer of screed material in measured sections, ensuring proper coverage and thickness distribution.
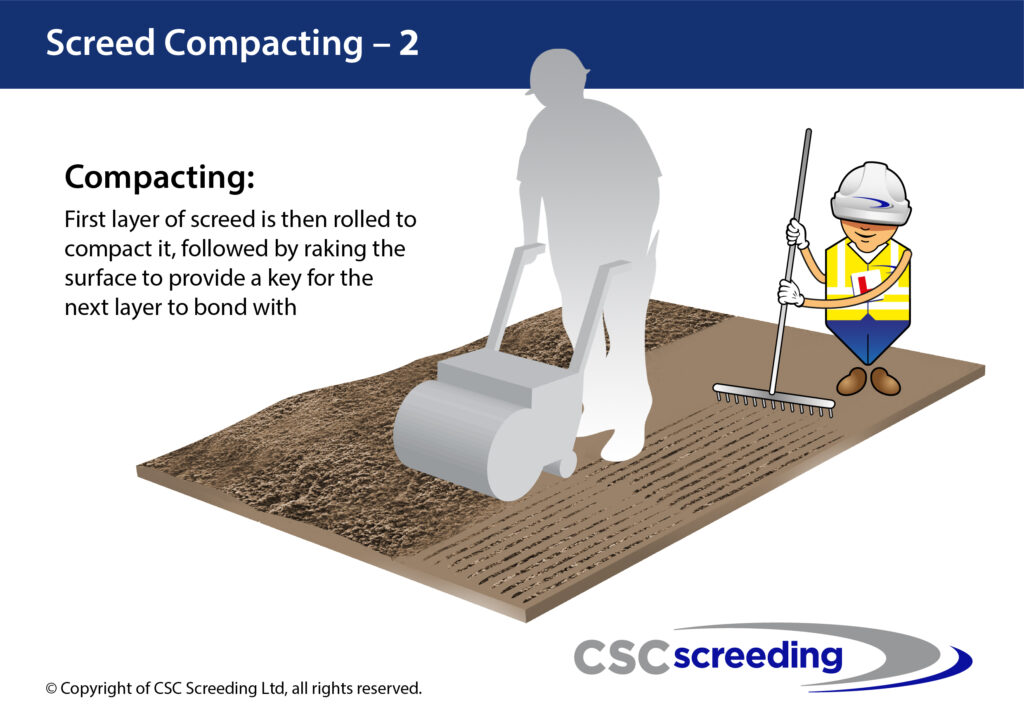
Roll the first layer to compact it, then rake the surface to create a key for the next layer to bond with.
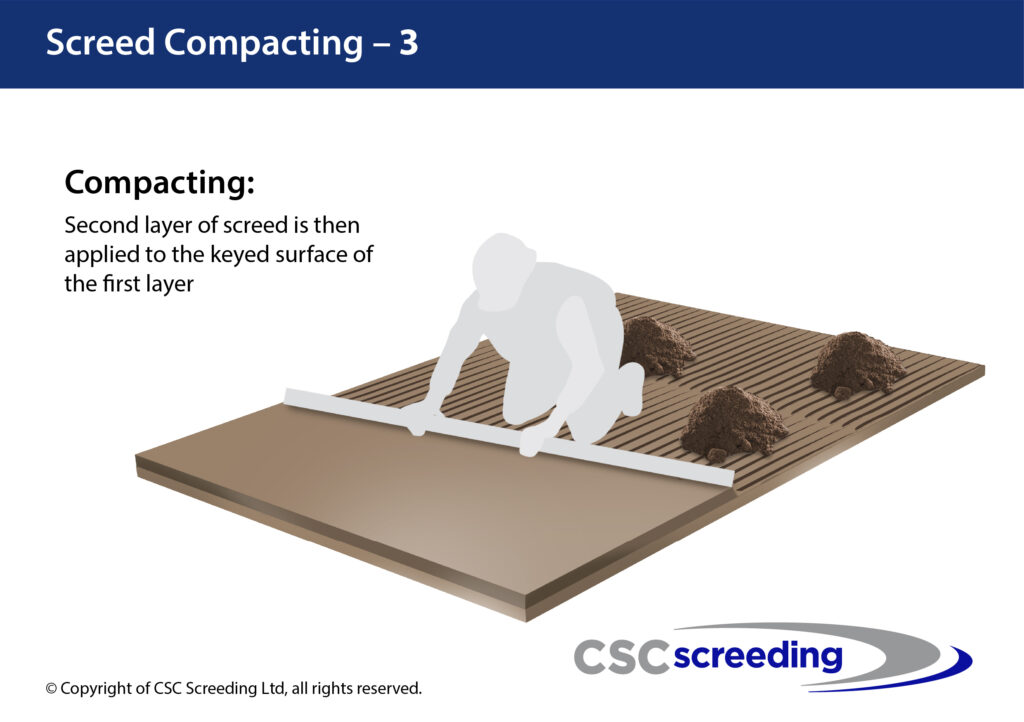
Apply the second layer to the keyed surface of the first layer, ensuring proper bonding and final thickness.
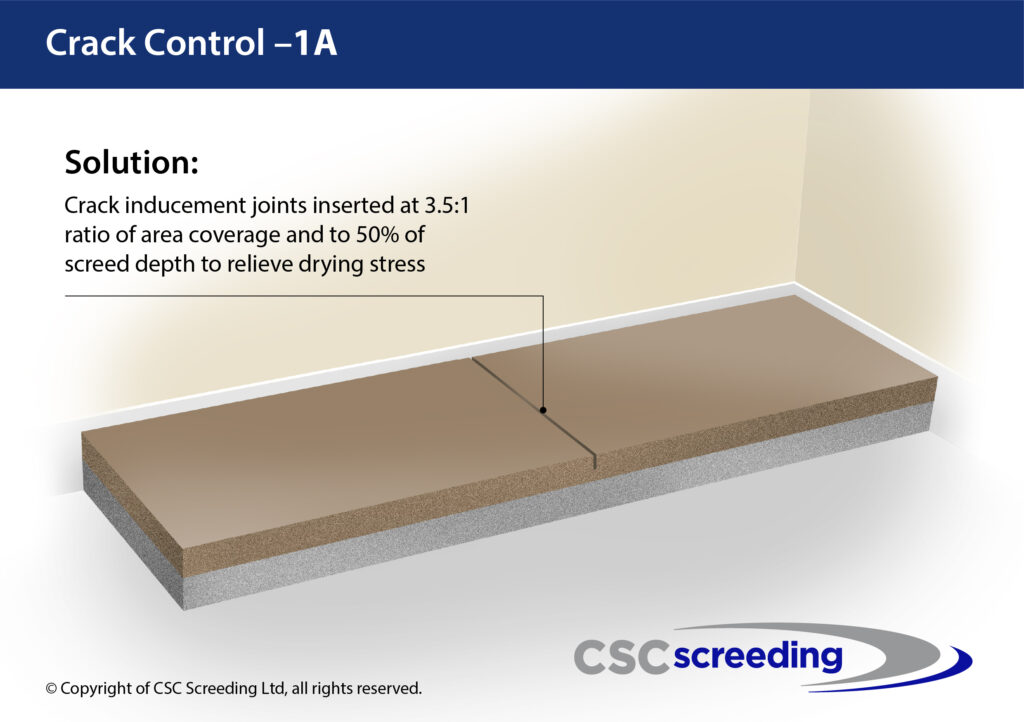
Joints inserted at 3.5:1 ratio of area coverage to 50% of screed depth to relieve drying stress.
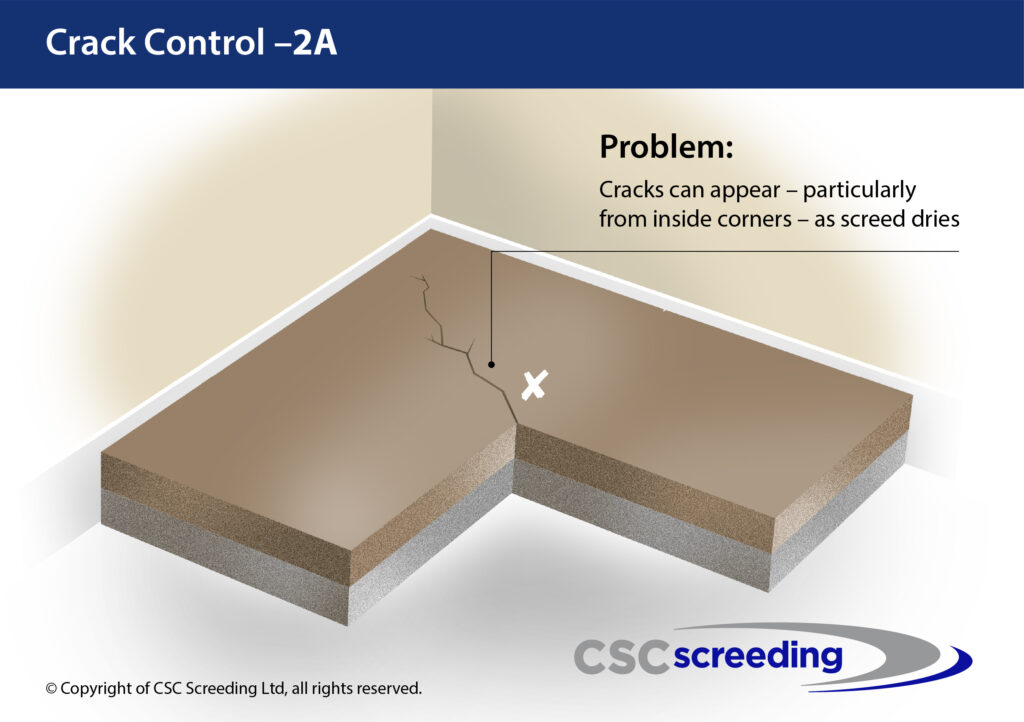
Identifying where cracks can appear, particularly from inside corners as screed dries and shrinks.
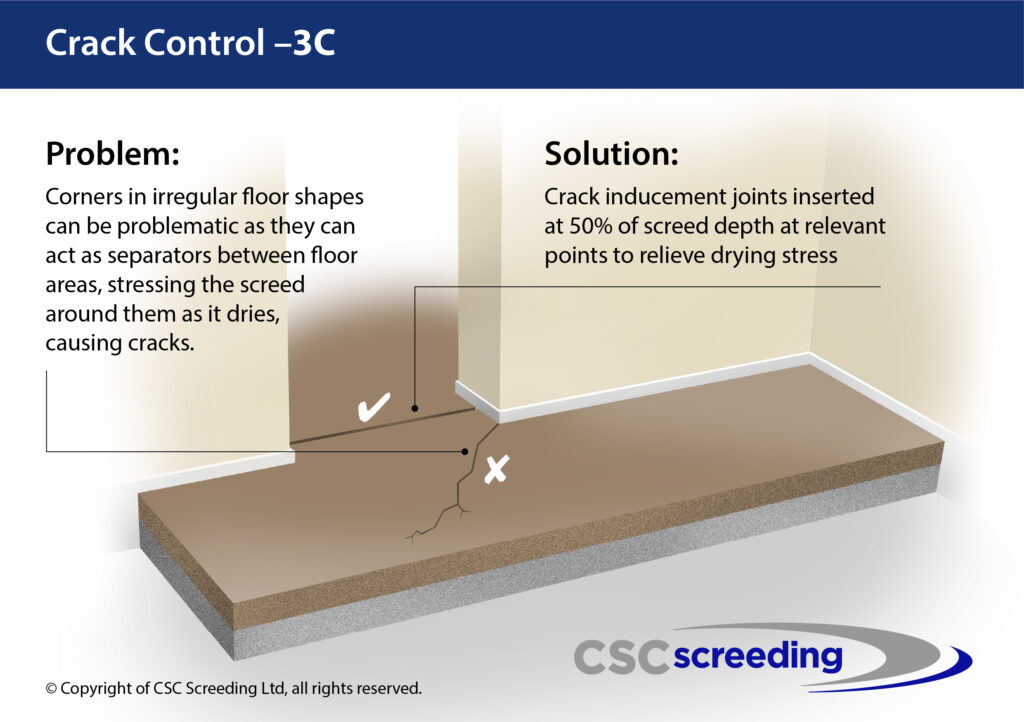
Problem and solution combined: strategic joint placement prevents stress concentration and cracking.
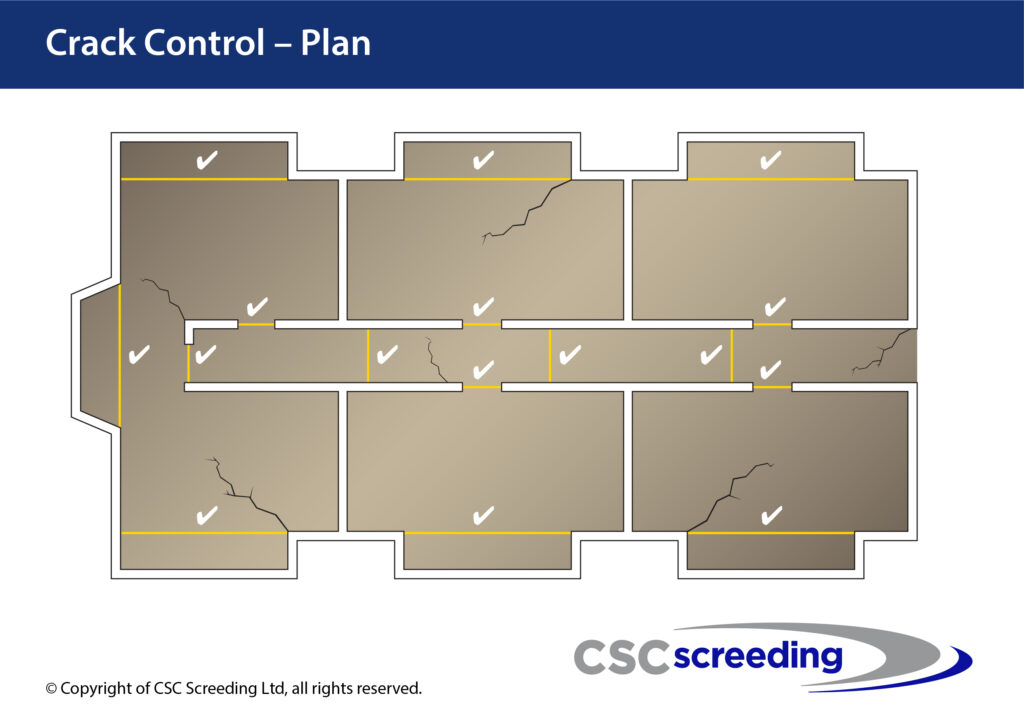
Strategic placement of crack inducement joints across an entire floor layout to prevent uncontrolled cracking.
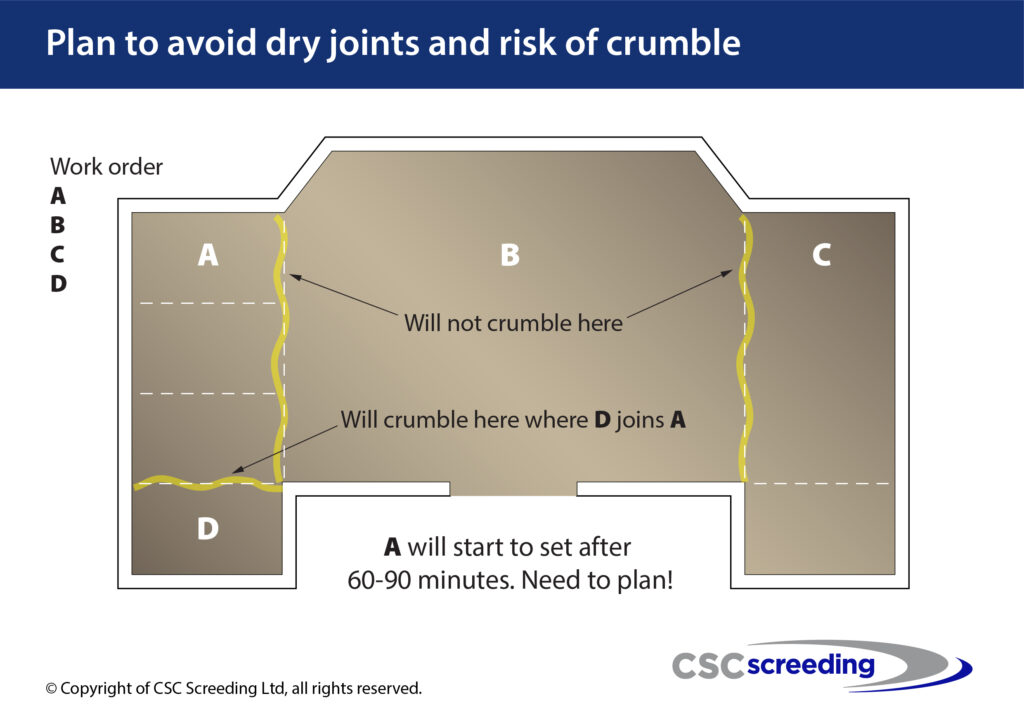
Section A will start to set after 60-90 minutes. Proper work order planning prevents dry joints where new screed meets partially set material, which can lead to crumbling at the junction.
Applied directly to the structural slab with excellent thermal conductivity
– Risk of cracking
– Substrate dependen
– Limited movement accommodation
+ Independent movement
+ Waterproof barrier
+ Substrate protection
– Thicker application
– Reduced thermal conductivity
– Higher material usage
+ Thermal insulation
+ Acoustic benefits
+ Energy efficiency
– Thickest application
– Careful installation
– Loading considerations

Modern self-leveling screed systems for construction
Flowing screed represents one of the most significant advances in modern floor construction.This pumpable, self-leveling technology offers superior thermal performance, installation speed, and surface quality compared to traditional methods. Understanding its properties and applications is essential for modern construction professionals.
Applied directly to the structural slab with excellent thermal conductivity
Flowing screed (also called liquid screed or self-leveling screed) is a pumpable mixture that creates perfectly level surfaces without manual leveling. It flows to eliminate voids and achieves superior surface regularity compared to traditional hand-laid screeds.
Key Characteristics:
• Self-leveling properties eliminate manual finishing
• Pumpable installation via specialized equipment
• Superior thermal conductivity for UFH systems
• Achieves SR1 tolerance (±3mm) consistently
• Void-free installation around pipes and cables
Performance Advantage
Installation speed is 5-10x faster than traditional screeding, with large areas (200m²+) completed in single pours without joints.
Anhydrite-Based (Calcium Sulphate)
• Nearly 2x better thermal conductivity than cement
• 98% recycled content (environmentally friendly)
• Minimum 45mm thickness over UFH pipes
• 1mm/day drying up to 40mm, then 1mm/2 days
• Can cover up to 2000m² without expansion joints
Cementitious (Cement-Based)
• Portland cement with fine limestone and additives
• Minimum 75mm thickness over UFH systems
• Superior strength for high-traffic areas
• Better chemical resistance (alkaline properties)
• Faster overall project completion
Selection Criteria
Choose anhydrite for UFH systems requiring thermal efficiency. Choose cementitious for high-traffic commercial areas requiring superior durability.
Installation requirements per BS 8204 and BS EN 13813 standards
| British Standard | Coverage |
|---|---|
| BS 8204-1 | Installation requirements |
| BS 8204-7 | Pumpable self-smoothing screeds |
| BS EN 13813 | Material properties |
• Truck-mounted pumps (up to 190m horizontal)
• Boom pumps (16-36m reach)
• Hose systems for tight access
• On-site or ready-mix delivery
• Surface preparation and priming
• Edge strip installation
• Pumped application via hoses
• Self-leveling to achieve smooth finish
| Classification | Tolerance | Application |
|---|---|---|
| SR1 Standard | ±3mm tolerance | High-quality finishes |
| SR2 Standard | ±5mm tolerance | Standard applications |
Note: Flowing screeds consistently achieve SR1 standard due to self-leveling properties.
• 200+ m² coverage per day possible
• Minimal labor requirements
• Fast drying (24-72 hours for foot traffic)
• Consistent thickness and level
• Void-free around UFH pipes
• Reduced shrinkage and cracking
| Property | Flowing Screed | Traditional Screed |
|---|---|---|
| Installation Speed | 200+ m² per day | 20–40 m² per day |
| Surface Regularity | SR1 (±3mm) consistently | SR2–SR3 (±5–10mm) |
| Thermal Conductivity | Nearly 2× better (anhydrite) | Standard cement properties |
| Minimum Thickness (UFH) | 25–45mm | 75mm minimum |
| Void-Free Installation | Complete encapsulation | Risk of air voids |
| Large Bay Coverage | Up to 2000m² continuous | 40m² maximum bays |
| Foot Traffic Ready | 24–48 hours | 7–14 days minimum |
Critical factors for successful flowing screed installation
Pre-Installation Requirements
Critical factors for successful flowing screed installation
Quality Control Procedures
| Layer | Specification | Thickness |
|---|---|---|
| Floor Finish | Tiles, carpet, or vinyl flooring | As per finish |
| Adhesive/Primer Layer | Bonding agent as required | Minimal |
| Cement:Sand Screed | Mix ratio 1:3 to 1:4.5 | 25–40mm |
| Compressive Strength | 20–25 N/mm² | |
| Surface Regularity | SR1 (3mm in 3m) | |
| Concrete Structural Slab | Surface prepared clean and sound | Structural |
| Primed if Required | ||
| Min. Compressive Strength | 25 N/mm² |
| Layer | Specification | Thickness |
|---|---|---|
| Floor Finish | Selected finish type | As per finish |
| Cement:Sand Screed | Mix ratio 1:3 to 1:4.5 | 50–65mm minimum |
| Well compacted and level | ||
| Minimum 28-day cure | ||
| Separating Membrane | Polythene sheet (1000 gauge) | Membrane |
| Lapped joints minimum 150mm | ||
| Turned up at perimeter | ||
| Concrete Structural Slab | Prepared substrate | Structural |
| Layer | Specification | Thickness |
|---|---|---|
| Floor Finish | As specified | As per finish |
| Cement:Sand Screed | Mix ratio 1:3 to 1:4.5 | 65–75mm minimum |
| Reinforcement may be required | ||
| Edge strips at perimeter | ||
| Day joints as required | ||
| Insulation Layer | Rigid foam insulation boards | As designed |
| Minimum compressive strength | ||
| Vapor barrier if required | ||
| Concrete Structural Slab | Prepared substrate | Structural |

Your authoritative resource for floor screeding knowledge, expert guides, and professional insights.
© 2025 CSC Screeding Ltd. All rights reserved.